
Kriptofolio app series – Part 3: Architecture patterns MVC, MVP, MVVM with Android Architecture Components – ViewModel, LiveData, Data Binding, Room
The most important thing to focus when starting to build new app is to think about its architecture first. The biggest mistake you can make is to go with no architecture style at all. Architecture choice topic was becoming so controversy for Android community in the past recent years, that even Google decided to get involved and in 2017 proposed their own approach of standardized architecture by releasing for the first time Android Architecture Components set to make developers life easier. In this post first I am going to discuss why we need to architecture our apps, what options do we have, than we are going to learn how to do that. Rather than reinventing the wheel, we will be using guidelines provided by Android team. I won’t lie, this post was hardest one for me to write because my own lack of knowledge in it. First I had to study architecture topic really well to see a bigger picture clear of how should be modern Android app created. Now I am ready to share my findings with you.
Series content
- Introduction: Roadmap to build modern Android app in 2018-2019
- Part 1: SOLID principles
- Part 2: Mockups, UI, XML layouts
- Part 3: Architecture patterns MVC, MVP, MVVM with Android Architecture Components – ViewModel, LiveData, Data Binding, Room (you’re here)
- Part 4: Dependency Injection with Dagger 2
- Part 5: Handle RESTful Web Services using Retrofit, OkHttp, Gson, Glide and Coroutines
Why should you care about app architecture?
Usually when you start working with Android you end up writing most of the core business logic in activities or fragments. I think that happened to all new Android developers, including myself too. All short tutorials, all samples suggested doing that. And actually for such small apps created just for explanation or demo purpose that works good enough. However try to do that on the real app which is constantly changing according to users needs and expanding in new features. Soon you will see that your coding experience is getting more and more painful. Everything becomes managed by so called “God Classes” like activities or fragments, which have so many lines of code that you get lost easily. Basically all you code starts to remind a spaghetti where everything is mixed up and all the parts depends on each other. Than when new changes are required by the business, you are left with no choice but just to rebuild entire project. Also that’s the point where architecture questions starts naturally to appear.
Is there a better way to structure your code?
Of course there is! The key for high quality code is to follow SOLID principles, about which I talked in my previous post (not without a reason), and also apply some architecture pattern for separation of concerns. Actually separation of concerns should be your ultimate goal as it is the most significant point which indicates code quality. There are quite a few patterns out there for app architectures. Most well known that you probably heard about already are classic three tier architectures such as:
- MVC: Model-View-Controller
- MVP: Model-View-Presenter
- MVVM: Model-View-ViewModel
All these patterns represents the main similar idea – to structure your project’s code that way that it would be separated to the different generic layers. Every layer has its own responsibility, that’s why you project becomes modular, separated code parts better testable and your app flexible enough for continuous changing.
It can become really a wide topic to talk about each pattern individually, so I am going only to introduce to each one in short just to understand main differences.
The Model-View-Controller (MVC) pattern
This pattern was the first iteration Android app architecture approach back in the old times. It suggests to separate your code to 3 different layers:
Model — the data layer. Responsible for handling the business logic and communication with the network and database layers.
View — the user interface (UI) layer . It’s a simple visualization of the data from the Model.
Controller — the logic layer, gets notified of the user behavior and updates the Model as needed.
 This is MVC schema and in it we can see that both the Controller and the View depend on the Model: the Controller to update the data, the View to get the data. However the Model is nicely separated and could be tested independently of the UI.
I have found out that there are few approaches of how to apply MVC pattern. It’s quite confusing. One is when activities and fragments act like the Controller. They are in charge of processing the data and updating the views. The problem with this architecture approach is that activities and fragments can become quite large and very difficult to test. Another approach which seems more logical and the correct one where activities, fragments should be the Views in the MVC world. The Controllers should be separate classes that don’t extend or use any Android class, and same for the Models.
Anyway if you investigate more about MVC you will find out that when applied on Android project even the correct way the code layers are still too much dependable on each other, that’s why I would not recommend to use it anymore for your next Android app.
The Model-View-Presenter (MVP) pattern
After the first approach which didn’t work, Android developers tried and moved to use one of the most popular architectural patterns – MVP, which represents second iteration of architecture choice. This pattern became widely used and still is recommended one, especially for anybody who just starts Android development, as it is easy to learn. Let’s have a look at its 3 separate layers roles:
Model — the data layer, which is the same as on MVC pattern. Responsible for handling the business logic and communication with the network and database layers.
View — the user interface (UI) layer. Displays the data and notifies the Presenter about user actions.
Presenter — retrieves the data from the Model, applies the UI logic and manages the state of the View, decides what to display and reacts to user input notifications from the View. This is essentially the controller from MVC except that it is not at all tied to the View, just an interface.
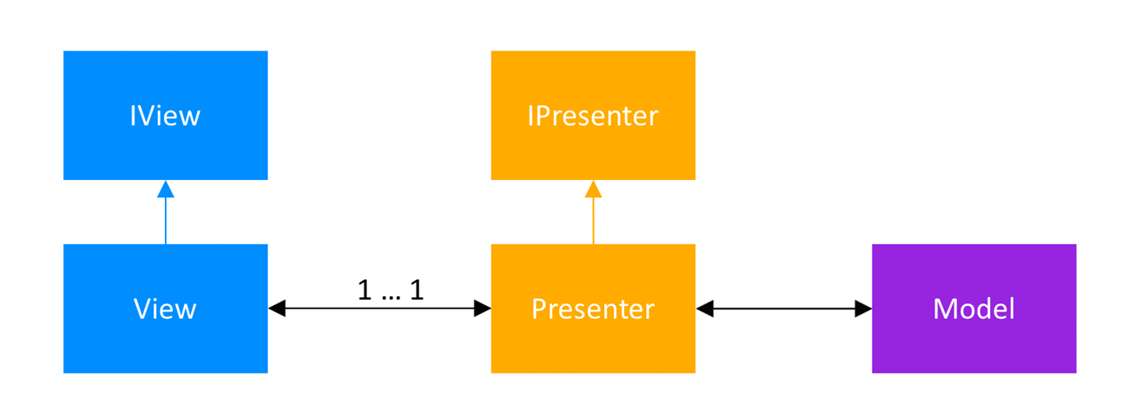 MVP schema shows that the View and the Presenter are closely related as they need to have a reference to one another. Their relationship is defined in a
 Contract interface class.
This pattern has one significant but controllable disadvantage that the Presenter tends to expand to a huge all-knowing class if you are not careful enough and don’t break your code according to single responsibility principle. However generally speaking MVP pattern offers a very good separation of concerns and confidently could be your main choice for the project.
The Model-View-ViewModel (MVVM) pattern
MVVM pattern is the third iteration approach, which became recommended architecture pattern by Android team with Android Architecture Components release. That’s why we will be focusing learning this pattern most of all. Also I will be using it for “My Crypto Coins” app. As before let’s take a look at its separate code layers:
Model — abstracts the data source. The ViewModel works with the Model to get and save the data.
View — that informs the ViewModel about the users’ actions.
ViewModel — exposes streams of data relevant to the View.
The difference compared to MVP pattern is that in MVVM the ViewModel does not hold a reference to the View as it is with the Presenter. In MVVM the ViewModel exposes stream of events to which various Views can bind to while on the MVP case the Presenter directly tells the View what to display. Let’s take a look at MVVM schema:

 In MVVM the View has a reference to ViewModel but ViewModel has no information about the View and there is a many-to-one relationship between View and ViewModel.
Comparison of MVC vs MVP vs MVVM
Here is a table which sums up on all the patterns I talked about:

As you may noticed MVC is not so good compared to MVP and MVVM when building modular testable modern app. Anyway any pattern has its own advantages and disadvantages, and is a good choice if it exactly fits your needs. I suggest you to investigate and learn much more about all these patterns as it is worth to do it. Meanwhile I will continue my project with the trending pattern in 2018, which is also pushed forward by Google – MVVM.
Android Architecture Components
If you’re familiar with Android application lifecycle you know what a headache it can be when you try to build an app and avoid all data flow problems, persistence, and stability issues which usually appear during configuration change. In 2017 Android team said it’s enough to struggle, assumed responsibility from the developers and introduced Android Architecture Components framework which finally lets you to solve all these issues without complicating your code or even applying hacks to it.
Android Architecture Components is a collection of libraries that help you design robust, testable, and maintainable apps. At the current moment when I am writing this blog post it consists of these components:
- Data Binding – declaratively bind observable data to UI elements
- Lifecycles – manage your activity and fragment lifecycles
- LiveData – notify views when underlying database changes
- Navigation – handle everything needed for in-app navigation
- Paging – gradually load information on demand from your data source
- Room – fluent SQLite database access
- ViewModel – manage UI-related data in a lifecycle-conscious way
- WorkManager – manage your Android background jobs
With the help of the Android Architecture Components we are going to implement MVVM architecture pattern in My Crypto Coins app following this diagram:
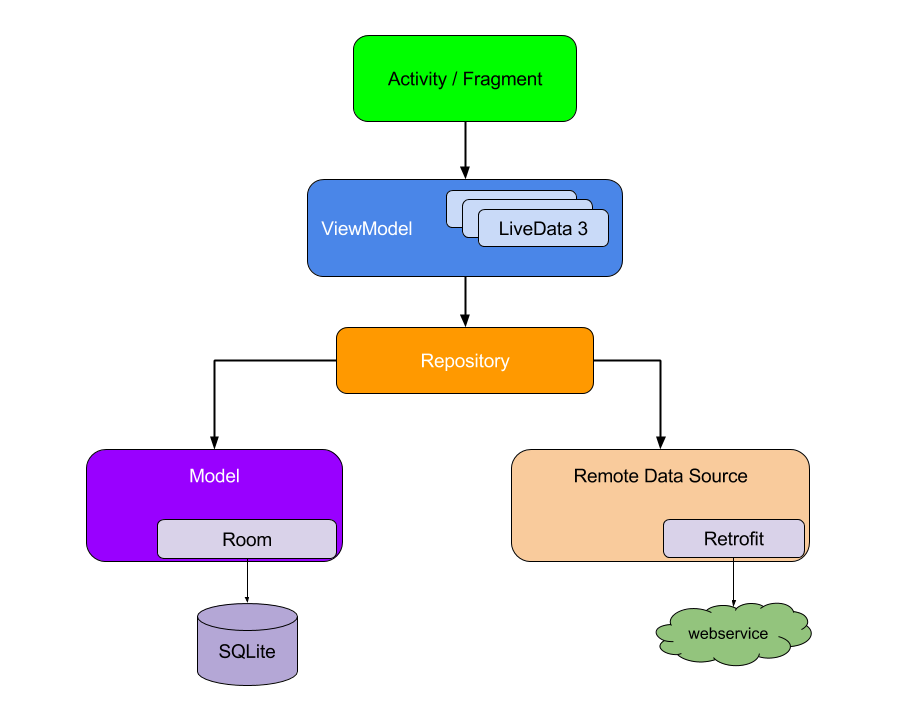 It’s recommended architecture by Google and it shows how all the modules should interact with one another. Next we’ll be covering only the specific Android Architecture Components that we will use in our project.
Organizing your source files
Before starting development process the point which can be missed out when considering app architecture is how we should organize project source files. The fact is that we can not leave this question unanswered as later we would have a messy structure hard to understand and modify. There are several ways to do it. One is to organize by components category, for example all activities goes to their own folder, all adapters goes to their folder and so on. Another one would be to organize everything by app features, for example search and add crypto in all crypto currencies list feature goes to its own addsearchlist folder. The main idea which I want to tell you is that you need to do it someway instead of having everything placed randomly. I use some kind of mix of both of these.

Besides project folder structure you should consider to apply some rules for naming project files. For example when naming Android classes you should define class purpose clearly in the name.
ViewModel
For the start of our app architecture development, first we are going to create ViewModel. View models are objects that provide data for UI components and survive configuration changes.
You can use a ViewModel to retain data across the entire lifecycle of an activity or a fragment. Activities and fragments are short-lived objects which are created and destroyed frequently as a user interacts with an app. A ViewModel is also better suited to managing tasks related to network communication, as well as data manipulation and persistence.
As example now let’s create ViewModel for MainListFragment to separate UI data from it.
class MainViewModel : ViewModel() {
    ...
}
Than obtain ViewModel with single line of code.
class MainListFragment : Fragment() {
    ...
    private lateinit var viewModel: MainViewModel
    ...
    override fun onActivityCreated(savedInstanceState: Bundle?) {

        super.onActivityCreated(savedInstanceState)

        setupList()

        // Obtain ViewModel from ViewModelProviders, using this fragment as LifecycleOwner.
        viewModel = ViewModelProviders.of(this).get(MainViewModel::class.java)
        ...
    }
    ...
}
Basically that’s it, congratulations! 🙂 Let’s move on.
LiveData
LiveData is an observable data holder class. It follows observer pattern. LiveData is lifecycle-aware which means that it only updates app component (activity, fragment, etc.) observers that are in an active lifecycle state. LiveData class returns the latest value of the data. When data changes it returns updated value. LiveData is best suited with ViewModel.
We will use LiveData together with ViewModel like that:
...
class MainViewModel : ViewModel() {

    private val liveData = MutableLiveData<ArrayList<Cryptocurrency>>()
    val data: LiveData<ArrayList<Cryptocurrency>>
        get() = liveData

    init {
        val tempData = ArrayList<Cryptocurrency>()

        val btc:Cryptocurrency = Cryptocurrency("Bitcoin", 1, 0.56822348, "BTC", 8328.77, 4732.60, 0.19, -10.60, 0.44, 20.82)
        val eth:Cryptocurrency = Cryptocurrency("Etherium", 2, 6.0, "ETH", 702.99, 4217.94, 0.13, -7.38, 0.79, 33.32)

        tempData.add(btc)
        tempData.add(eth)

        liveData.value = tempData
    }
}
Observe data on the ViewModel, exposed as a LiveData:
...
class MainListFragment : Fragment() {

    private lateinit var recyclerView: RecyclerView
    private lateinit var recyclerAdapter: MainRecyclerViewAdapter

    private lateinit var viewModel: MainViewModel

    ...

    override fun onActivityCreated(savedInstanceState: Bundle?) {

        super.onActivityCreated(savedInstanceState)

        setupList()

        // Obtain ViewModel from ViewModelProviders, using this fragment as LifecycleOwner.
        viewModel = ViewModelProviders.of(this).get(MainViewModel::class.java)

        // Observe data on the ViewModel, exposed as a LiveData
        viewModel.data.observe(this, Observer { data ->
            // Set the data exposed by the LiveData
            if (data != null) {
                recyclerAdapter.setData(data)
            }
        })
    }
    ...
}
Browse the repository at this point in the history here.
Data Binding
Data Binding Library was created to remove boilerplate code needed to connect to XML layouts.
To use Data Binding in your Kotlin projects you will need to turn on support for annotation processors with kapt compiler plugin and also add data binding block to Android configuration gradle file:
...
apply plugin: 'kotlin-kapt'

android {
    ...
    dataBinding {
        enabled = true
    }
}
...
To use data binding generated classes we need to put all the view code in <layout> tags. The most powerful concept of data binding is that we can bind some data class to xml layout and item properties to fields directly.
<layout xmlns:app="http://schemas.android.com/apk/res-auto"
    xmlns:tools="http://schemas.android.com/tools">

    <data>

        <variable
            name="cryptocurrency"
            type="com.baruckis.mycryptocoins.data.Cryptocurrency" />
    </data>

    ...

            <android.support.v7.widget.AppCompatTextView
                android:id="@+id/item_name"
                style="@style/MainListItemPrimeText"
                android:layout_marginEnd="@dimen/main_cardview_list_item_text_between_margin"
                android:layout_marginStart="@dimen/main_cardview_list_item_inner_margin"
                android:text="@{cryptocurrency.name}"
                android:textAlignment="viewStart"
                app:layout_constraintBottom_toTopOf="@+id/item_amount_symbol"
                app:layout_constraintEnd_toStartOf="@+id/guideline1_percent"
                app:layout_constraintStart_toEndOf="@+id/item_image_icon"
                app:layout_constraintTop_toTopOf="parent"
                app:layout_constraintVertical_chainStyle="spread"
                tools:text="@string/sample_text_item_name" />

     ...
</layout>
RecyclerView adapter with data biding will look like this:
class MainRecyclerViewAdapter() : RecyclerView.Adapter<MainRecyclerViewAdapter.BindingViewHolder>() {

    private lateinit var dataList: ArrayList<Cryptocurrency>

    fun setData(newDataList: ArrayList<Cryptocurrency>) {
        dataList = newDataList
    }

    override fun onCreateViewHolder(parent: ViewGroup, viewType: Int): BindingViewHolder {
        val inflater = LayoutInflater.from(parent.context)
        val binding = FragmentMainListItemBinding.inflate(inflater, parent, false)

        return BindingViewHolder(binding)
    }

    override fun onBindViewHolder(holder: BindingViewHolder, position: Int) = holder.bind(dataList[position])

    override fun getItemCount(): Int = dataList.size

    ...

    inner class BindingViewHolder(var binding: FragmentMainListItemBinding) : RecyclerView.ViewHolder(binding.root) {
        fun bind(cryptocurrency: Cryptocurrency) {
            binding.cryptocurrency = cryptocurrency

            binding.itemRanking.text = String.format("${cryptocurrency.rank}")
            ...
            binding.executePendingBindings()
        }
    }
}
At last no more writing findViewById 🙂 Browse the repository at this point in the history here.
Room
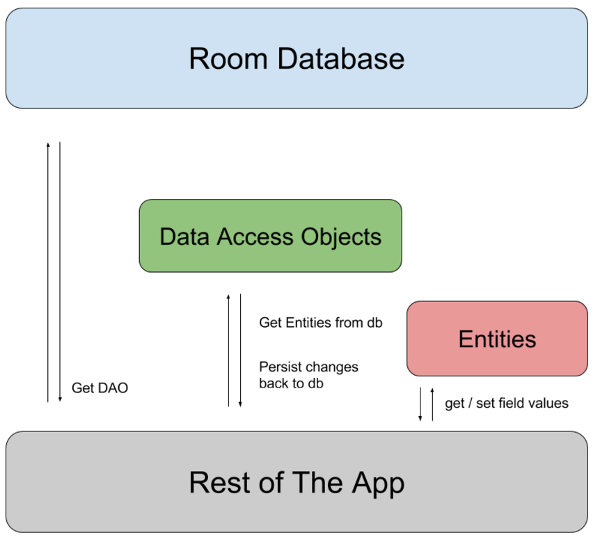
Our app needs to store persistent data of different cryptocurrencies that user holds. This should be stored inside local database that is kept inside Android device privately. For storing structured data in a private database we will be using SQLite database which is often the best and recommended choice. In order to create SQLite database for our app we will use Room – a persistence library made by Android team which basically is a wrapper above SQLite. It is an abstraction layer that removes much of the boilerplate code you need to interact with SQLite, and it also adds compile-time checking of your SQL queries. The best way to think of it is as a (ORM stands for Object Relational Mapper) tool designed to automatically generate glue code to map between your object instances and rows in your database.
There are basically 3 major components in Room:
- Entity – component represents a class that holds a database row. For each entity, a database table is created to hold the items.
- DAO (Data Access Object) – the main component which is responsible for defining the methods that access the database.
- Database – component which is a holder class that uses annotation to define the list of entities, the list of DAOs, database version and serves as the main access point for the underlying connection.
Let’s follow these simple steps to setup Room in our My Crypto Coins app:
1. Create an Entity.
@Entity
data class Cryptocurrency(val name: String,
                          val rank: Short,
                          val amount: Double,
                          @PrimaryKey
                          val symbol: String,
                          val price: Double,
                          val amountFiat: Double,
                          val pricePercentChange1h: Double,
                          val pricePercentChange7d: Double,
                          val pricePercentChange24h: Double,
                          val amountFiatChange24h: Double)
Add some extra information to tell Room about its structure in the database.
2. Create the DAO.
@Dao
interface MyCryptocurrencyDao {

    @Query("SELECT * FROM Cryptocurrency")
    fun getMyCryptocurrencyLiveDataList(): LiveData<List<Cryptocurrency>>

    @Insert
    fun insertDataToMyCryptocurrencyList(data: List<Cryptocurrency>)
}
For the start we are going to create a DAO which only allows us to retrieve records from the table that we have created with Entity and also to insert some sample data.
3. Create and setup the Database.
It is important to say that the Database instance should ideally be built only once per session, and the one way to achieve this would be to use a Singleton pattern.
@Database(entities = [Cryptocurrency::class], version = 1, exportSchema = false)
abstract class AppDatabase : RoomDatabase() {

    abstract fun myCryptocurrencyDao(): MyCryptocurrencyDao


    // The AppDatabase a singleton to prevent having multiple instances of the database opened at the same time.
    companion object {

        // Marks the JVM backing field of the annotated property as volatile, meaning that writes to this field are immediately made visible to other threads.
        @Volatile
        private var instance: AppDatabase? = null

        // For Singleton instantiation.
        fun getInstance(context: Context): AppDatabase {
            return instance ?: synchronized(this) {
                instance ?: buildDatabase(context).also { instance = it }
            }
        }

        // Creates and pre-populates the database.
        private fun buildDatabase(context: Context): AppDatabase {
            return Room.databaseBuilder(context, AppDatabase::class.java, DATABASE_NAME)
                    // Prepopulate the database after onCreate was called.
                    .addCallback(object : Callback() {
                        override fun onCreate(db: SupportSQLiteDatabase) {
                            super.onCreate(db)
                            // Insert the data on the IO Thread.
                            ioThread {
                                getInstance(context).myCryptocurrencyDao().insertDataToMyCryptocurrencyList(PREPOPULATE_DATA)
                            }
                        }
                    })
                    .build()
        }

        // Sample data.
        val btc: Cryptocurrency = Cryptocurrency("Bitcoin", 1, 0.56822348, "BTC", 8328.77, 4732.60, 0.19, -10.60, 0.44, 20.82)
        val eth: Cryptocurrency = Cryptocurrency("Etherium", 2, 6.0, "ETH", 702.99, 4217.94, 0.13, -7.38, 0.79, 33.32)

        val PREPOPULATE_DATA = listOf(btc, eth)

    }

}
private val IO_EXECUTOR = Executors.newSingleThreadExecutor()

// Utility method to run blocks on a dedicated background thread, used for io/database work.
fun ioThread(f : () -> Unit) {
    IO_EXECUTOR.execute(f)
}
As you see on initial run database will be prepopulated with some sample data just for testing purpose.
4. EXTRA step. Create the Repository.
The Repository is not part of the Architecture Components libraries, but is a suggested best practice for code separation and architecture.

It stands as a single source of truth for all app data in case you have to manage multiple data sources.
class MyCryptocurrencyRepository private constructor(
        private val myCryptocurrencyDao: MyCryptocurrencyDao
) {

    fun getMyCryptocurrencyLiveDataList(): LiveData<List<Cryptocurrency>> {
        return myCryptocurrencyDao.getMyCryptocurrencyLiveDataList()
    }

    companion object {

        // Marks the JVM backing field of the annotated property as volatile, meaning that writes to this field are immediately made visible to other threads.
        @Volatile
        private var instance: MyCryptocurrencyRepository? = null

        // For Singleton instantiation.
        fun getInstance(myCryptocurrencyDao: MyCryptocurrencyDao) =
                instance ?: synchronized(this) {
                    instance
                            ?: MyCryptocurrencyRepository(myCryptocurrencyDao).also { instance = it }
                }
    }
}
We are going to use this repository in our ViewModel.
class MainViewModel(myCryptocurrencyRepository: MyCryptocurrencyRepository) : ViewModel() {

    val liveData = myCryptocurrencyRepository.getMyCryptocurrencyLiveDataList()
}
Our Fragment code also evolves.
class MainListFragment : Fragment() {

    ...

    private lateinit var viewModel: MainViewModel

    ...

    override fun onActivityCreated(savedInstanceState: Bundle?) {

        super.onActivityCreated(savedInstanceState)

        setupList()
        subscribeUi()
    }

    ...

    private fun subscribeUi() {

        val factory = InjectorUtils.provideMainViewModelFactory(requireContext())
        // Obtain ViewModel from ViewModelProviders, using this fragment as LifecycleOwner.
        viewModel = ViewModelProviders.of(this, factory).get(MainViewModel::class.java)

        // Update the list when the data changes by observing data on the ViewModel, exposed as a LiveData.
        viewModel.liveData.observe(this, Observer<List<Cryptocurrency>> { data ->
            if (data != null && data.isNotEmpty()) {
                emptyListView.visibility = View.GONE
                recyclerView.visibility = View.VISIBLE
                recyclerAdapter.setData(data)
            } else {
                recyclerView.visibility = View.GONE
                emptyListView.visibility = View.VISIBLE
            }
        })

    }

}
Because our ViewModel class now has a constructor which is not empty anymore, we need to implement a provider factory pattern which will be passed to the ViewModelProviders.of() method as the second parameter.
object InjectorUtils {

    fun provideMainViewModelFactory(
            context: Context
    ): MainViewModelFactory {
        val repository = getMyCryptocurrencyRepository(context)
        return MainViewModelFactory(repository)
    }

    private fun getMyCryptocurrencyRepository(context: Context): MyCryptocurrencyRepository {
        return MyCryptocurrencyRepository.getInstance(
                AppDatabase.getInstance(context).myCryptocurrencyDao())
    }
}
class MainViewModelFactory(private val repository: MyCryptocurrencyRepository) : ViewModelProvider.NewInstanceFactory() {

    override fun <T : ViewModel?> create(modelClass: Class<T>): T {
        return MainViewModel(repository) as T
    }
}
Browse the repository at this point in the history here.
Final thoughts
Design architectures, that we discussed in this part, should be used as informed guidelines but not a hard rules. I did not wanted to go too much into details on each topic. With Android Architecture Components I almost immediately showed you coding process, but have in mind that there is lot more to learn on each component individually and I advice to do that. In the third part we started to build a new app with best practices applied. Let’s summarize everything that we manage to make already:
My Crypto Coins app every separate screen has its own ViewModel, which will survive any configuration change and protect user from any data loss. App user interface is reactive type, which means, that it will update immediately and automatically when data changes in the back-end. That is done with the help of LiveData. Our project have less code as we bind to the variables in our code directly using Data Binding. Finally, our app stores user data locally inside device as SQLite database which was created conveniently with Room component. App code is structured by features and all project architecture is MVVM – recommended pattern by Android team.
Repository
“Kriptofolio” (previously “My Crypto Coins”) app really starts to get a shape. With the latest repository commit for this part 3 you can find it nicely showing prepopulated database data for the user with total holdings portfolio value calculated correctly.

This post was also republished on Medium. Show your support by clicking the clap button 👏 on the story page here. 😇🙏